Showing posts with label recipes. Show all posts

Wednesday, October 24, 2012

Roasted Butternut Squash and Cauliflower Soup

Make sure to enter the 21 Days to a More Disciplined Life giveaway from Money Saving Mom. It ends today!!

Last week was our final CSA pick-up for the season, so I had some autumn veggies to use up (and I don't usually like cauliflower!). I took a little bit of inspiration from this recipe by Soup Addict, but I'm happy to report that my many edits turned out excellent!

So, here it is, my Roasted Butternut Squash and Cauliflower soup (with a few secret ingredients) :)
The Recipe:
1 medium size butternut squash, peeled and cubed
1/2 large cauliflower head, or one medium, cut into florets
olive oil
salt and pepper
onion
garlic
2 quarts chicken stock
1/2 cup-1 cup apple cider
3 or 4 slices good quality sandwich bread, crusts removed and cubed
blender (immersion or counter)
optional bread and feta cheese for toppings

Preheat oven to 400. Fill a large baking sheet with the cut up squash and cauliflower. Drizzle with olive oil and sprinkle with salt and pepper. Bake for 30 minutes, flip and test, bake for an additional 20-30 minutes.

While the veggies are roasting, saute onion and garlic in a large stock pot. Add chicken stock and apple cider. Transfer cooked veggies to stock pot and let simmer for 10-30 minutes (however much time you have!).
Add cubed bread and allow to soak into the broth. Then use an immersion blender (or work in batches in a counter blender) to puree as finely as desired. This creates a dense, textured, and uniform soup that is hearty and tastes like autumn!

Serve topped with additional cubes of bread and feta cheese, if desired. I loved how rich and thick this turned out. The squash and cauliflower flavors melded together perfectly, and the hint of apple cider was really nice. I'm totally not a cauliflower person and my husband doesn't usually do squash, but we thought this was amazing. Enjoy!


Friday, October 5, 2012

Giveaway winner + Marshmallow Recipe

The winner of the photo book from Shutterfly is Becca. You've been emailed! Thanks to everyone who entered.

Last week I finally got around to trying my hand at making marshmallows. My godsister has made them for us and they are out of this world. I got the recipe from her and found time one evening to whip these up. They are not hard, but take a little bit of time. Mostly the time is just waiting for the sugar to cook or the marshmallows to whip, so it's not too complicated.

Normally I'm a roasted over the grill type of marshmallow eater, not straight from the bag. But these marshmallow are so good that I'll eat them "raw" no problem! SO GOOD! We've had them roasted as well, and probably my favorite (thanks to the cooler evenings), in hot chocolate. Totally delicious.


There are a ton of recipes out there, but I've only tried this one from Joy Of Baking. I made vanilla and coated half with powdered sugar and the other half with baking cocoa to make chocolate. I can't wait to try some other varieties next!

Monday, August 20, 2012

Sautéed Mushrooms...a favorite with our kids!

Yep, you read that right. Our kiddos ask for mushrooms at the store and get super excited when we serve these at dinner. Maybe lots of children like mushrooms? I always associated them with one of those under-appreciated and not kid-friendly foods.

The way I cook mushrooms is so simple and easy that I can hardly even call it a recipe. I guess it's really more like a method. These mushrooms first won over my husband in the early months of our marriage. I only made a serving for myself and he decided to "give them a try." That was the last time I sautéed mushrooms for one!

It took several times of trying mushrooms for our kids to really enjoy them, and even now my son is hit or miss. Some nights he has seconds and some nights he only eats one or two mushrooms. On the whole, this is one of our favorite meal sides, and I often serve it as a second or third veggie since it is so easy to make.


I start with about a tablespoon of butter and a non-stick skillet set to medium-low.


While the butter is melting I chop my mushrooms quickly (my family preferes chunks to slices), and dump them into the pan of heated butter. I usually use about 8-10 good sized mushrooms, but on this occasion I probably used about 14. I give them a little stir with some tongs and let them sit.


About 8-10 minutes later they look like this. I give them another stir, making sure that any raw ones end up on the bottom.


After this stir I usually add some seasoning. We like salt and pepper with parsley, but also enjoy this seasoned salt.


One of our favorite seasonings was this sample pack of Sazon Tropical by Badia. The free sample is all gone and I need to hunt this down next time I'm at the store. It was fantastic on mushrooms and our roast chicken.


After another 8-10 minutes I give the mushrooms another stir and toss with another round of seasoning. Depending on how they look, I may turn down the heat to keep them warm while I wait for the rest of the meal to be ready, or I may let them cook a little longer. Only a few of the mushrooms were golden, crispy brown at this point because it was a larger batch, so I let them be for another 5 minutes or so.


At which point I ended up with this delicious pan of mushrooms just begging to be eaten!


Does your family do mushrooms? If not, maybe this would be a way to try them!

Thursday, March 15, 2012

Easy Roast Chicken

We love rotisserie chickens, especially from Costco. So juicy and moist, and a whole chicken can transform into several meals. Over the last year I finally got up my nerve to roast a chicken on my own. And I am totally hooked!

Each time I do it they taste better and better and are easier and simpler. I think I actually prefer my own roasted chicken to one from Costco now!

There are tons of options for roasting a chicken, but here is my super easy recipe.

Preheat oven to 400. Rinse chicken, removing any giblets from the cavity. Pat the chicken dry and do a quick check to remove any feathers that are still attached. Place the chicken in a baking dish. I'd love to have a Le Creuset dutch oven, but since I don't I just use a large Pyrex dish.

In a small dish, soften 1 Tbsp. butter (about 15 sec in the microwave). Using a silicone pastry brush (or just a spoon), mix in your seasonings. This time I used about a teasp. of dry parsley and a teasp. of Italian seasonings, along with some sea salt. Brush (or rub) the butter and herbs all over the chicken. You could peel up the skin and rub under also, but I've had great results shortcutting it on that lately! I also stuffed some onion in the chicken cavity, and added some to the baking dish.

Bake for 30-40 minutes. Check how brown the chicken is getting, baste with butter and juices in the pan. Bake for 15 minutes. Check and baste again. Usually at this point I cover the chicken with some foil. Bake for 15 minutes, check, then bake for 15 more minutes. The chicken should be completely done at this point (1 1/4 - 1 1/2 hours total bake time). Let it sit for 5-10 minutes before you cut and serve to allow the juices to set nicely. Enjoy!

There are tons of variations...basically do whatever your family likes! Add different seasonings to the butter, add lemon juice. Bake with potatoes and carrots, or even oranges for a twist. The possibilities are endless, and I love that there's very little hands on time!

Are you a rotisserie chicken family? It's a great feeling to walk by the chickens in the store and know that one of them can come out of my oven now!

Monday, February 27, 2012

Fiesta Lime Rice

Have I mentioned how much I love Pinterest? It's such a great way to find new recipes, and I knew as soon as I saw this one for Fiesta Lime Rice that I just had to try it. The original recipe comes from Skinny Taste, and this was a winner for our whole family!

We opted to serve the rice with chicken, avocado, and sour cream on top, instead of just as a side. We also enjoyed it in a tortilla wrap with chicken like a burrito. This rice is so great that there are tons of possibilities.

Ingredients:
1 1/2 cups cooked rice (use leftovers or make it fresh! 2 cups of water and 1 cup rice)
1/2 can black beans, rinsed and heated (about 3/4 cup)
3/4 cup frozen corn, thawed and heated
1 large tomato, diced
1 large scallion, diced
2-4 Tablespoons cilantro, chopped
juice from 1/2 lime (about 1 Tablespoon)
salt and pepper to taste

Cook rice. Heat beans and corn. Combine rice, beans, corn, tomato, and scallion in a large bowl. Add cilantro and lime juice as desired, then season with salt and pepper to taste. Serve as a side dish, with tacos, or pile chicken, avocado, cheese, sour cream on top as preferred. A great way for each family member to add what they like to dinner!

Monday, February 13, 2012

Broccoli Chicken Cheddar Braided Crescent Recipe

This is our new favorite meal!

This beautiful braided crescent is easy and quick - as in the whole thing is prepped while your oven preheats! That's my kind of dinner. I saw this recipe on Food Family Finds, and knew I had to try it.

Mix together chicken (I've used canned chicken as well as Cousin Darlene's chicken), broccoli, cheese, egg, and mayo together in a bowl. When I used leftover chicken I didn't add the mayo.

Spread your crescent rolls out to form a rectangle. You can use store-bought crescents, but I've been making my own and they are fantastic! I think I've actually cured myself of the urge to buy Pillsbury crescent rolls! (recipe below)

Add the chicken mixture to the middle of the crescent roll rectangle. Then use kitchen shears or a knife to make strips along each side. (this looks like the braided calzone, doesn't it?!?)

Beginning from one end, alternate sides, pulling the dough across at an angle. Each strip should be close to the one before it, but it certainly does not need to be perfect.

This part actually goes quickly...

and yet the final result is awesome!

Brush the braid with a wash of egg white mixed with a tablespoon of water. Top with more cheese if desired.

Bake in your preheated oven at 375 for 30 minutes...golden, cheesy, and delicious!


Homemade Crescent Roll Recipe (adapted from food.com)
2 eggs
1/2 cup sugar
1/2 cup Crisco
1 cup warm water
2 1/4 teaspoons yeast
1 teaspoon salt
4 cups flour

Beat eggs and sugar until well combined. Add sugar, Crisco, water, yeast, salt, and 2 cups flour. Gradually add remaining 2 cups of flour. Turn out onto a well floured surface and knead in enough additional flour so the dough is no longer sticky. I usually do not have to add much additional flour. 
Divide the dough in half - each half makes about 12 crescent rolls or one broccoli chicken braid.


  • To make immediately, let dough rise in a warm place for about 1 hour. Then shape dough into crescent rolls and bake or flatten on a cookie sheet for the braid.


  • To make later, store in the refrigerator without rising. As long as you let it sit for about 4 hours, that will be sufficient rise time in the fridge. Or store for up to 4 days and use as above. 


  • Broccoli Chicken Cheddar Braided Crescent Recipe (adapted from Food Family Finds)


  • 2 cups chicken, cooked and chunked - use canned or leftover chicken for minimal prep
    1 cup shredded cheddar cheese
    2 cups chopped frozen broccoli, thawed
    1 egg yolk (reserve egg white for wash)
    1/2 cup mayonnaise
    rosemary (or other preferred herb)
    crescent roll recipe (above) or 2 cans of Pillsbury crescent rolls

    Preheat oven to 375. Combine chopped chicken, cheese, broccoli, egg yolk, mayo, and rosemary in a bowl. Spread crescent roll dough onto a large cookie sheet lined with a silicone baking mat or parchment paper. Add the chicken mixture to the middle of the dough. Using kitchen shears or a knife, cut strips along each side of the chicken. Start from one end and alternate sides, pulling a strip of dough across to the opposite side. When the whole braid is finished, add about 1 Tablespoon of water to the reserved egg white and brush the top of the braid with the wash. Sprinkle additional cheese if desired. Bake for 30 minutes until golden brown. Slice and enjoy!

    Tuesday, February 7, 2012

    Quick dinner recipe: Cheesey baked chicken

    This has been a family favorite since I was in middle school. My family has always called it Cousin Darlene's Chicken, thanks to my dad's cousin who made it for us originally. Its super easy, and I even make it in the crockpot if I'm going to be out for a while that particular day.

    All you need is condensed cream of chicken soup (or mushroom works too), swiss cheese, and bread crumbs or Stove Top stuffing. And chicken!

    I spread a little of the soup in the bottom of my baking dish with a spatula. Place chicken in the baking dish and cover with remaining soup. You could also add a little water, depending on how much chicken you are making. Top with swiss cheese and sprinkle on stuffing. Bake at 375 for 30-35 minutes, or until chicken is done.

    I probably shouldn't even include these "after" pictures. The lack of daylight when I finish dinner is really making it difficult to post recipes! Trust me, these look way better in person. (And yes, two large pieces of chicken are already missing)

    We usually serve this with rice and veggies. The soup makes a lovely sauce that is amazing poured over your rice. This is a great comfort food in the winter, and a winner for the whole family!

    Side note: I am planning to use these instructions from Mindfully Frugal Mom to make my own cream of chicken soup. Have you ever made yours from scratch? I'm looking forward to trying it!

    Friday, January 27, 2012

    Chick-Fil-A style chicken nugget recipe

    One of the most read posts on Thrifty Living is the Chick-fil-a nugget recipe. It always makes me cringe slightly when I click back through the post, though, because the pictures are not some of my best quality! So, here is an updated post of the same recipe.


    You will need:
    Cooking Oil {you can use Peanut but it is not necessary} -- I always use vegetable oil and they taste great
    1 Egg
    1 Cup of Milk
    1 Cup of Flour
    2 1/2 Tablespoons of Powdered Sugar
    1/2 Teaspoon Pepper
    1 Tablespoon of Salt (I cut that in half)
    2 Skinless Boneless Chicken Breast, cut in strips or cubed 

    First mix together the egg and milk and let the chicken pieces set in the mixture. (There is plenty of speculation that Chick-fil-a adds dill pickle juice to the marinade, but I've never done this). In a separate bowl, combine flour, sugar, salt and pepper and stir.

    I let it soak for an hour or so. Its nice to be able to prep everything before hand so all I have to do is coat and cook the chicken when its time to eat.

    Heat oil (I used a cast iron skillet on the stove over medium heat). Dredge the chicken pieces in the flour mixture until coated. I usually double dip - so egg/milk, then flour, back to egg/milk, then flour.

    Place chicken in hot oil. Cook about 5 minutes per side, depending on the size of your nuggets. Resist the urge to flip too early! You want them to be golden brown.

    Once the chicken is cooked on both sides, remove from oil and place on a paper towel to dry. I usually cook mine in two batches.

    Be sure to pair with your favorite dipping sauces...we use BBQ, ranch dip, blu cheese dip, ketchup, or honey.

    These are really best the day they are cooked. We usually have a few leftovers, and they are just not the same the next day!

    Originally from Under the Table and Dreaming, though you can find it on many different blogs as well.

    Wednesday, November 23, 2011

    Traveling Ideas & Thanksgiving Links

    If your family is anything like ours, then you will probably be doing a fair amount of traveling for the upcoming holidays. And traveling with little ones in the car is always a bit of a challenge. The last few months we've been putting together some ideas for the car that don't involve watching movies or playing computer/tech games. Here are a few favorites!

    Color Matching/Fine motor skills (Inspiration):

    These are made from paint chip samples! I used two of each identical paint chip, one I cut up and glued to clothes pins, the second for the clothes pins to be clipped on.

    To make the paint chips a little more durable and to minimize the number of clothespins I needed, I doubled the up the paint chips. Purple on the back of green, blue on the back of orange, etc. This is super fun!

    Tracing pages (Inspiration):

    We use plastic page protectors and a dry erase marker to make these reusable tracing pages. There are tons of tracing pages that are free to print! These are Thanksgiving themed, but we switch them up based on the seasons.

    My daughter also enjoys tracing letters and numbers this way.

    Another favorite for adults and children alike is audio books! We check out a lot of audio books from the library. Some recent favorites including Mike Mulligan and His Steam Shovel (With CD),

    I also wanted to include a few favorite bread recipes that are great for special occasions (or really any day!).

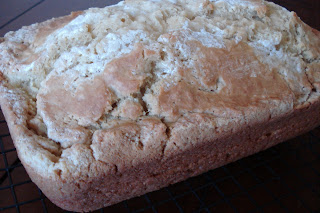
    Homemade Beer Bread. Mmmm I just made a loaf of this yesterday. Its so simple to make and way less expensive than those pre-packaged mixes. And great toasted with butter for breakfast!

    I love The Frugal Girl's recipe for Honey-Glazed rolls. These are awesome...you really should try them!

    And of course, a favorite all fall long for us was Pumpkin Spice Scones.

    Do you have any car activities that are family favorites? Or a special recipe that you are making this Thanksgiving? Please share!

    Monday, November 21, 2011

    Crock-pot recipes

    I've tried out a few nice crock-pot recipes lately, so I thought I would share them!

    First up, French Onion Soup!

    This recipe is from Smashed Peas and Carrots and turned out great! Even our kids enjoyed the soup, and we had it with homemade french bread that we topped with swiss cheese. It warmed up really great too, which made for a nice lunch the next day.

    We also tried Apple Pie Oatmeal from Healthy Slow Cooking. This recipe is great to make the night before...then breakfast is ready first thing in the morning! Since you are cooking the oatmeal overnight, it calls for steel cut oats since they hold up better. I'll probably add a bit more water next time since the oatmeal stuck in a few places. Other than that, this recipe is a keeper too!

    Have you tried out any new crock-pot recipes lately? Feel free to post them in the comments. I'm always looking for something new to try!

    Wednesday, October 12, 2011

    Baked Apple Cinnamon Oatmeal

    Another of our favorite apple recipes is this one. I love how the house smells while this is baking in my oven! Its a simple recipe, and unlike many baked oatmeal recipes I've seen, it does not call for a ton of sugar. I also like the contrast between the sweetness of the oatmeal and the tart Granny Smith apples. Top it with almonds and dried cranberries too. You've got to try this recipe!


    I doubled this recipe for the first time recently and it worked like a charm.

    The original recipe is from Two Peas and Their Pod, though I've made a few alterations.

    Baked Apple Cinnamon Oatmeal

    Ingredients:
    2 cups old fashioned oats
    1/4 cup light brown sugar
    1 1/2 teaspoons cinnamon
    1 teaspoon baking powder
    1/4 teaspoon salt
    1 1/2 cups skim milk (I cut it back by 1/4 cup)
    1/2 cup applesauce
    1 tablespoon melted butter
    2 egg whites (I use 1 whole egg)
    1 teaspoon vanilla
    1 large Granny Smith apple, cored, and diced

    Method:
    Preheat oven to 350.

    In a large bowl, mix together oats, brown sugar, baking powder, salt, and cinnamon. Set aside. In a second bowl, combine egg, milk, applesauce, melted butter, and vanilla. Whisk until combined. Pour the wet ingredients into the bowl of dry ingredients and stir until combined. Add apples and stir. Pour oatmeal into a greased 8 x 8 glass baking dish.

    Bake for 20 minutes. I always give the oatmeal a stir after 20 minutes and bake for an additional 10 minutes to firm up the oatmeal. Top it with chopped almonds or dried cranberries.
    Related Posts with Thumbnails