Friday, April 30, 2010

Food Waste Friday

I've been participating in Food Waste Friday with The Frugal Girl for a while now; I go through our fridge (and freezer) on Friday and toss anything that has gone bad. I also take a look at what needs to be used up so that it does not go bad and try to work that into our meals over the next few days. This has really helped us to throw out less food (and so we're actually buying less because we're using what we've already bought!).

This week I threw out a little bit of bagged salad. Throwing out salad materials has been a pattern lately and is totally my fault in terms of just forgetting to plan to eat it. I really am going to to try to prevent and lettuce from ending up in next week's picture!

Also I threw out a very little bit of chicken meat from tacos. Tacos have been hard for me to eat both this pregnancy and with my daughter...I really need to just hold off on making them until this baby arrives!


Thursday, April 29, 2010

Kohl's mailer with $10 off $10 purchase


Last week in the mail I received a flier for Kohl's that included a card for $10 off a $10 purchase! They send these out from time to time, and are a great way to get something for free (or for very little out of pocket). My card expires the first of May, so I am planning to use mine tomorrow.

Companies often send out ads like this one with a really great offer (this is basically free money to spend in the store), but they are banking on most people spending more than the $10 they are giving you. If I have something picked out at Kohl's, then spending the $10 on that and getting a $30 outfit for $20 is a good deal. But if I mindlessly go into Kohl's to use my $10 and end up picking out $30 worth of stuff that looks good just so I can get it for $20, then it probably isn't a good deal. I wrote more extensively about my opinions of what makes a good deal here.

I'm planning on finding something little as close to $10 as I can. Did you get this mailer from Kohl's too? How are you planning on spending it?

Tuesday, April 27, 2010

Free Cards for Mother's Day

Both Kodak and Shutterfly are offering free photo cards in honor of Mother's Day again. (You will have to pay shipping for both offers, but that is cheap!)

Kodak is offering a free 5x7 photo card through May 4, 2010. Order by May 2 if you want it in time for Mother's Day. You can also make the card for another occasion. Use the code 4MOM when you check out. Shipping is 99 cents.

Shutterfly is offering 3 5x7 photo cards through April 29, 2010 (hurry on this one!). Again, you are able to make these for another occasion if you do not need that many Mother's Day cards! Use the code CARDS4MOM when you check out.


I have made photo cards with both Kodak and Shutterfly before and they are really easy to do and look awesome!

Friday, April 23, 2010

Food Waste Friday

I've been participating in Food Waste Friday with The Frugal Girl for a while now; I go through our fridge (and freezer) on Friday and toss anything that has gone bad. I also take a look at what needs to be used up so that it does not go bad and try to work that into our meals over the next few days. This has really helped us to throw out less food (and so we're actually buying less because we're using what we've already bought!).

This week's casualties were a result of last weekend's Passover Seder with friends. We were a few weeks late on the seder, since Passover was earlier this month, but it was a lot of fun. However we had a few leftovers that I was unmotivated to eat this week: a little bit of matzah casserole and a lone potato pancake.


Going through your fridge every week is a super easy way to be more "green" on a regular basis. Check out my other posts from this week on Cloth Diapers, our cloth diaper routine, and reducing our paper waste!

Thursday, April 22, 2010

Reducing our Paper Waste

Today, many blogs are sharing tips for how to conserve more and waste less in honor of Earth Day. While I think it is good that there is a day to help us remember that we need to take care of our planet, I also think it is more important to be a good steward of the planet on a daily basis. For our family, this means taking practical steps to make our daily routine more "green".

One of the biggest things that we have done over the past year is working to reduce the amount of paper waste we throw out. We used to go through a TON of paper towels, and often it was just for something as simple as spilled water on the counter or floor. The same was true for paper napkins - we'd use them for something little and then toss the napkin in the trash.

So, about this time last year, I went to Walmart and bought a pack of 18 washcloths for $4. We keep these in our napkin holder near the table. It looks a little funny, but they sure get the job done.


When I need to wipe up condensation from the table after dinner, I use a washcloth. If I'm wiping down the counter tops after cleaning up the kitchen, I use a washcloth. To clean off my daughter's sticky fingers and face after a meal, we grab a washcloth (instead of a wet wipe!).
After they've been used, we make a pile in the kitchen, which I take to the laundry room at night to be washed with the next load. Since we have so many, we never run out, and I actually prefer them to paper towels! A regular wash cloth is thicker so it gets grime up better AND cleans better when it is wet. I try not to cringe when we are over at people's houses and see them going through paper towels sometimes!
We've cut way back on our paper towel usage and we use no paper napkins (except if we're having a party). I know we've saved a ton of money on paper products, but we've also drastically reduced the amount of paper waste that we throw out. It's great to see all of the good things that have come from such a simple change.
Have you started anything in the last year that has cut down on your waste? Using washcloths is a super easy place to start! Also, think about going through your fridge once a week to see what food needs to be used up before it goes bad...you can check back tomorrow to see how we did this week with Food Waste Friday!

Wednesday, April 21, 2010

Our Cloth Diaper Routine

This post is mostly going to be an overview of how we do cloth diapers on a day to day basis. If you have any specific questions, please feel free to ask.

We chose to use bumGenius one-size pocket diapers, and we have 14 of these. When we first started we also used 2 gdiapers (size small) with prefolds so we had 16 diapers. We also decided that we would wash our diapers every other day instead of trying to do it every day. We wash the diapers in the evening so that they can air dry overnight.

We usually lay the shells out on our upstairs banister

And the inserts we hand up to dry in the laundry room. Sometimes the shells get hung up and we throw the liners in the dryer. We used to put the shells in too from time to time, but this really beats up the velcro. Our velcro has stayed much stickier by letting the shells air dry.
The liners still are pretty white, even after a year of continuous use. This is the "worst" of our stains, and even it is hard to make out.
One thing I've tried to do is use cloth wipes. This has been more difficult than using cloth diapers. My wipes are just baby washclothes (the box on the left) and I keep a spray bottle with water by the changing table to wet the diapers. In theory, cloth wipes are much easier because they go right in the diaper pail with the diapers. But it is still habit to grab a disposable wipe for us. We have cut back on the wipes we go through, so I still consider that to be progress!


A life-saver for us since our daughter began solid foods is flushable liners. We bought the toddler size of these liners and tear each one into 3 pieces. The smaller pieces fit into the diaper well, and we get triple the use out of each liner! These liners look a lot like a dryer sheet, but stiffer when they are new. If your child just has a wet diaper, they go into the diaper pail and get washed along with the rest of the diapers. If there is a bowl movement, the waste sticks to the liner and falls out of the diaper easily into the toilet. After a few washings (and always air dry, the dryer breaks them down much quicker) the liners begin to get very soft and start to fall apart. Usually we end up flushing them before that happens, but sometimes we get one that looks like this:
The only complaint we have with the liners is that sometimes they seem to give our daughter diaper rash quicker. If she has a very messy bowl movement, she will get red quicker than in a disposable, which we think is because the liner keeps the waste closer to her body. The good thing about this is that she seems to be quickly learning to tell us if she has pooped - at least she will confirm it if we ask her.
The mornings after the diapers have been washed, I try to stuff all of them so they are ready to go for the next two days. I am notoriously bad at remembering to do this (even though it takes maybe 5 minutes!) and so many days I stuff each diaper as needed.


When we change a diaper, the used one goes right into our diaper pail (we don't use a fancy one) which is a trash can with a wet bag in it. The wet bag is fantastic!


We have a Blueberry one that has a draw string closure. When its full, we dump the diapers into the washer and throw the wetbag in after them.

I prewash our diapers with cold water, and then add a Tablespoon of my homemade laundry detergent and wash with hot water. I am so thankful for my HE washing machine that makes it super affordable to wash diapers every two days. After washing, we pull out our clean-smelling diapers and hang them to dry for the next day!
I do try to strip the diapers every month (its more like every other month or every other other month) by washing with bleach. This helps keep any smell from building up when the diapers are wet and helps them to stay absorbent.

One of the main complaints with bumGenius diapers is that the velcro wears out. While this is probably the biggest problem that we've had with them too, it is not something that makes us regret choosing this style. As I stated above, line drying the diapers has really helped to keep up the velcro. The velcro is what makes these diapers just as easy to use as disposables also! When we did our diaper trial, we tried fuzzibunz (which is very similar to bumGenius except for snap closures) and did not feel like we could get as good a fit on our daughter. Of course, other people may have different experiences too!
Here is a picture of my worst looking diaper. The velcro on the front has pulled away from the diaper shell. Actually, it should be a really quick fix with my sewing machine, I just need to do it!


One of the main things that people ask when they hear we use cloth diapers is "But isn't that so much extra work??" While washing diapers every other day or every day may be more actual work, the way I've found to make it work for our family is to make it just part of the routine. I do not keep a lot of disposable diapers on hand, so I have to wash diapers if my daughter is going to have something to wear!

The flip side to this all is that I rarely have to shop for diapers. I do keep my eyes open in the drug store ads so that I can pick up a pack for cheap or free every few months, but other than that, cloth diapering saves me the time of buying diapers!

If you use cloth diapers and have anything to add, please feel free to do so in the comments. As always, any questions are welcome too!

Monday, April 19, 2010

Cloth Diapers: Helpful Resources

We have used cloth diapers on our daughter for over a year now! I see this as a huge accomplishment, because now we are so used to using cloth that is has become second nature. One of my first posts on this blog was about how we made the decision to use cloth diapers. I wanted to share a little bit more about our decision process in choosing cloth diapers, as well as some cloth diapering resources that I have found useful over the many months of cloth diapering!


I used Baby cheapskate to find some of my first cloth diapering resources. It was there that I was introduced to Jillian's Drawers - where I buy my cloth diapers. Jillian's Drawers has a program where you can test cloth diapers in your home for 3 weeks. At the end of the 3 weeks you can return everything and only pay $10!

I have since found a few other similar programs. Franklin Goose is does a month long cloth diaper trial program for $10. Diaper Daisy has a program where you only have to pay return shipping on the diapers in the 2 week trial. I'm sure there are many other trials out there too!


Another resource I've found is the ladies that write Prayer of Hannah. Many of them use cloth diapers on their children and share their experiences from many different lifestyles (including washing their cloth diapers in apartment complexes where the laundry is down the hall!).


Cotton Babies, the makers of bumGenius (our favorites), often will have items on sale, Sometimes they sell 'seconds' -- diapers with slight defects -- for discounted prices as well!

Diaper Pin is a website filled with cloth diapering resources. On the main page is a list of cloth diapering sales. There are also a number of forums where you can get information about cloth diapers from others who use them, including a place to buy and sell used diapers. You can also check out reviews on tons of different diapers, which could help the decision process!

The biggest thing that helped us to make a smooth transition to cloth diapering was the trial program. I totally recommend doing an in-home trial of diapers before investing the money. The best part for us was that we were able to see how it felt to used cloth diapers all day long, wash them at night, and them use them again the next day. We also were able to see several different cloth diapers and figure out which kind we preferred.

One of the scariest things about beginning to cloth diaper for us was that we knew no one who used cloth. Since starting cloth, we have met many people who use cloth diapers too (many of them bumGenius like we do). We've also been able to encourage several friends to try cloth and they have had great results!

If you have any questions about starting to cloth diaper or any of the resources that I mentioned, please let me know. On Wednesday I'll be going over our routine for daily use, care, and washing of our cloth diapers.

Friday, April 16, 2010

Food Waste Friday

I've been participating in Food Waste Friday with The Frugal Girl for a while now; I go through our fridge (and freezer) on Friday and toss anything that has gone bad. I also take a look at what needs to be used up so that it does not go bad and try to work that into our meals over the next few days. This has really helped us to throw out less food (and so we're actually buying less because we're using what we've already bought!).

This week I threw out a little bit of spinach. We ended up with way too much salad left over when our families came for Easter, and this spinach is all we wasted, so I'm pretty happy about that. I also threw out some pepperoni from the freezer. It was a large bag we got from Costco that got terribly freezer burned.


How did you do this week? Have you been working to waste less food too?
Happy Friday and enjoy the weekend!

Wednesday, April 14, 2010

Brand new toy - Second hand price

Yesterday I spotted this while taking a quick look through the local Goodwill:

Its a brand new (still sealed) Bristle Blocks basic set. The sticker priced it at $17.49, but Goodwill was selling it for $8.50. I looked online quick and found $15 to be a normal price for this toy in stores, so I got it for about half price.

Our Goodwill often will have brand new, unopened items for sale. I believe that they receive shipments from Target, which is where many of these items originate. I don't know for sure, but I'm guessing that other Goodwills receive donations from stores as well.
Have you something brand new in Goodwill or another second hand store? Yard sale season is starting up too, which can be other way to get new or even just gently used items for a fraction of their original cost. Happy hunting!

Monday, April 12, 2010

Building a Rasied Bed Garden

I've been planning to build a raised bed garden for my backyard for a year or so now, but I knew that it was not something I could do on my own, especially now being pregnant. A few weekends ago I was able to enlist the help of my parents and my husband to construct one for me! This is a very simple bed, nothing fancy, but it suits my purposes perfectly.

Materials bought from Lowes:
2 2x8x8 treated boards
3 deck slats (for stakes to go into the ground)
1 package of screws
8 cu. feet of garden soil
Total cost: $51

I compared this to the flimsy 46"x46" raised bed kit for $40 and a 4'x6' cedar kit for $80...I totally got the better deal.

My dad brought his circular saw and a workbench, and he and my husband each had a powerdrill. They used both so they didn't have to switch bits in and out as frequently.

First, we cut the boards once each. I wanted my raised bed to be about 2 feet deep and 6 feet long. They drilled holes for the corners and used screws to fasten in place. Additionally, they cut the deck slats (pictured below) into smaller pieces, with a point at the bottom. These were screwed on at all four corners, as well as every 2 feet along both the front and the back. They go down in the ground to prevent the bed from moving at all.

They also used a countersink to get the screws flush with the boards.


Attaching a support post to the middle:
The finished project!

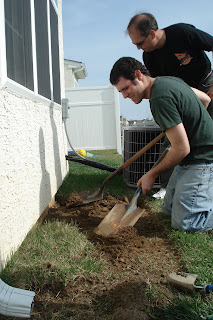
While they were finishing up the bed, my mom and I went to work digging up the grass. A spade works wonders for this...it was a lot easier than we thought, partially because it rained earlier in the week and everything was a little softer.


We set the bed down in place and it fit great! We had to dig out in places for the stakes to go down deep enough and used a level to make sure that the back and front of the bed were even.


Then we just added in the soil and it looked amazing!

This ended up being a fairly simple project, although building the frame was a two person job. It isn't anything fancy, but it is super practical, and was a way better deal than any of the kits they sell in stores. Since we built it, I was able to pick the size I wanted too, which was really good because my space needed something long and more narrow as opposed to the more square kits. We managed to get everything done, included an hour lunch, break in one afternoon.
Last week I posted some links about the easiest veggies to grow. I'm hoping to (re)plant my veggies sometime this week. I transplanted a few last week and they met a quick demise because of 90 degree weather followed by 50 degree weather and a torrential downpour overnight...


DIY Day @ ASPTL

Saturday, April 10, 2010

Buy one, get one free footlong at Subway - Today only

I usually try to give a little more notice on things like this, but I just called and confirmed this morning...ALL Delaware, Maryland, and Pennsylvania Subway restaurants are participating in buy one, get one free footlong sub today (April 10) only.

You can get more information about this on Subway's Facebook page.

Friday, April 9, 2010

Food Waste Friday

Well, after a few weeks of not pulling it together on Friday, I finally have a food waste picture to post. I've still been throwing things out, but by the time Friday hit the last few weeks, we were in overdrive mode with things to do, usually involving visits from family (which we love!).

Anyhow, I tossed half a can of refried beans today. I don't know when they were opened. We have not eaten Mexican in weeks. I kept checking them, thinking I would use them, but they ended up getting dried out because I didn't put them in an airtight container.

I did manage to salvage some things this week! I froze a bunch of strawberries (we ended up with 6 pounds in the fridge at one point Easter weekend) as well as some cantaloupe. I did have to throw out a good third of the cantaloupe because it was over ripened.

Have you gone through your fridge this week? I feel so much better prepared for our meals this coming week knowing what I need to use up now! Thanks as always to The Frugal Girl for starting Food Waste Friday!

Tuesday, April 6, 2010

Garden Prep Time

Spring appears to have finally come, (though with the temperature pushing 90 yesterday I am feeling like we skipped spring and went right to summer) which means its time to get ready to plant. I always loved gardening when I was little. We had a nice sized garden at my house, and my grandparents always had gardens that we would help tend and harvest.

I found a couple of great websites to help you determine when is the best time to put things in the ground to give your plants the best chance at survival. The Farmers Almanac has average frost dates for every state. I found this to be helpful in making sure that I did not plant too soon! I also stumbled across an interesting article on the Farmers Almanac website about the Top 5 Easiest to grow Vegetables. Of the 5 they listed, I am growing 4 this year!

Last year I kept it simple and only grew tomatoes, basil, and cilantro. We have to keep everything in pots, which makes it a little more complicated. On Monday I will share with you my new planting location, which I am so excited about!

Since I knew I would have some more space this year, I decided to start a bunch of different vegetables in these little peat pods. I got mine at Walmart, though I've seen them in garden departments at Home Depot, Lowes, etc, also. I got the case (which holds 72) along with all 72 pods for about $6. Next year I can reuse the case and just get some more pods.

I used them last year for my tomatoes and I felt like they worked really well for starting indoors and moving outside. Since each pod is separate, it is so easy to transplant them when your plant gets big enough. Of course, you do not have to buy something like this; there are many other ways to get your plants started.

When you first get these pods, they are very small (like above), but just add water and watch them grow!


They will end up being about 1 inch high, at which point you can add your seeds. I also found that my seeds sprouted quicker when using these little pods.


Are you planning on having a garden this year? Do you prefer veggies or flowers? I am super excited about the veggies I'm going to grow, but I also have some flowers that are coming up. Happy Spring!

Monday, April 5, 2010

Homemade Beer Bread Recipe

We love dense, flavorful beer bread! Normally, beer bread is sold in mixes that are super convenient because you only need to add beer. These mixes are severely overpriced, often as much as $6-$8 for a single loaf!

I have been making homemade beer bread over the last year or so, and it tastes so close to the mixes. While it is a little more complicated to make from scratch, it really only takes 10 minutes (the time it takes for my oven to preheat to bake the bread).

Here is the recipe I use, thanks to Moms Need to Know.

3 1/4-3 1/2 cups all-purpose flour
1/4 c. sugar
1 tsp salt
1 tsp baking soda
1 tsp baking powder
1 12-oz can/bottle beer
1 egg, slightly beaten
2-3 tbsp butter

Preheat oven to 350. While oven is preheating, combine all of the dry ingredients in a bowl and mix together well.


Once my oven is nearly heated all the way, I put the 3 T. of butter in my loaf pan and stick it in the oven for a minute or two. This melts the butter most of the way and I use that to coat the pan. I remove the remaining chunks to place on top.

Add beaten egg and 12 oz beer.


This makes a fairly thick batter


Pour into loaf pan and place the remaining butter on top.


Bake at 350 for 50 minutes and it will look like this!


This is great warm (of course) but also good toasted for breakfast!
Related Posts with Thumbnails